
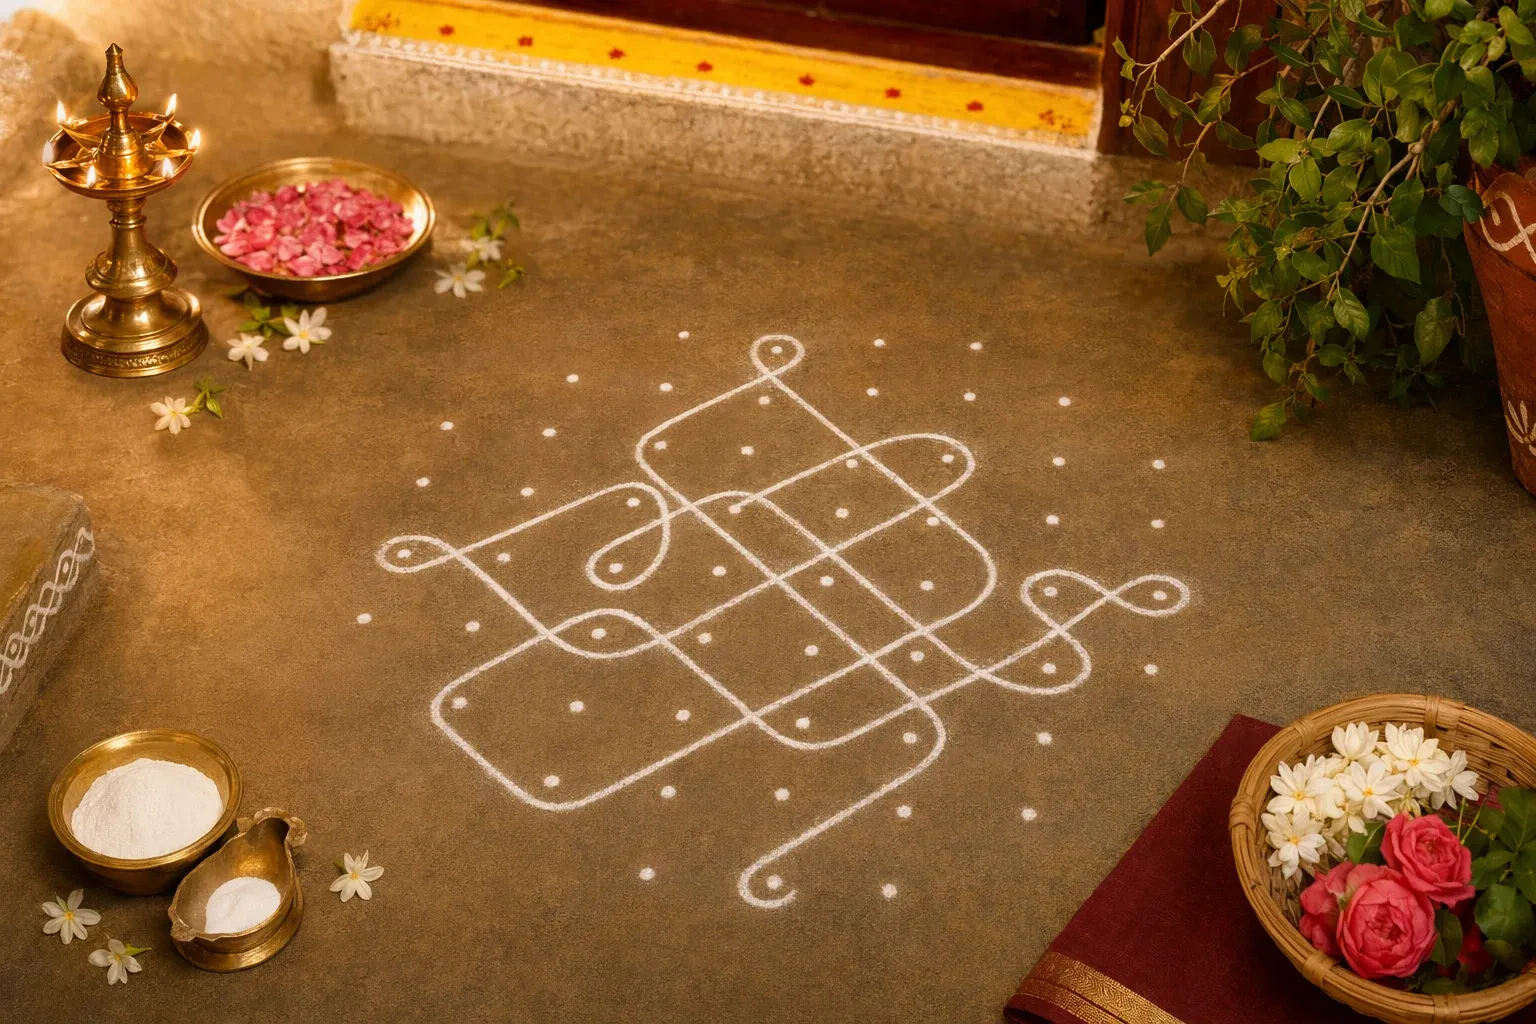
Pulli kolam is one of the most recognisable forms of kolam. The word pulli means dot in Tamil, so pulli kolam simply refers to kolam designs made with dots. At first, the dots may look like a guide for children. But once the lines begin moving around them, the dots become the hidden structure of a beautiful pattern.
For beginners, pulli kolam is a friendly doorway into kolam because the dots help you keep proportion. Instead of guessing where every curve should go, you place a grid first. The design then grows from that grid through lines, loops, curves, and symmetry.
What are the dots for?
The dots in pulli kolam act like anchors. They help the artist measure space and maintain balance. A row of dots may become a flower, lamp, bird, diamond, star, or looping geometric design. The dots can be connected directly, surrounded by lines, or used as reference points.
This is why two people can begin with the same dot grid and still create different designs. One may connect dots into straight shapes. Another may draw curves around the dots. A third may create a continuous line that travels around the whole grid.
Common dot grids
Beginners can start with small grids like 3 by 3, 4 by 4, or 5 by 5. Some grids are square, where each row has the same number of dots. Others are interlaced or tapering, such as 5 dots, then 4, then 3, then 2, then 1. Tapering grids often create diamond-shaped designs.
When reading kolam instructions, you may see numbers like 5-3-1 or 7-5-3-1. This usually describes the number of dots in each row. Once you understand this, many pattern instructions become easier to follow.
Lines around dots and lines through dots
Some pulli kolams connect the dots directly with lines. These can create geometric patterns, flowers, and borders. Other designs draw lines around the dots without touching them. These looping designs are often associated with sikku kolam or knot-like kolam styles.
In a looping design, the line travels around the dots and returns to complete a continuous path. This can feel like a puzzle. The challenge is to keep the line smooth and balanced so the final design looks complete.
Tradition, interpretation, and historical context
In tradition, pulli kolam is part of everyday South Indian floor-art practice, especially in Tamil cultural settings. Dot patterns are learned by watching, repeating, and memorising. Many families have favourite designs for ordinary days and more elaborate ones for festivals.
In interpretation, the dot grid can symbolise order beneath beauty. The visible design looks graceful, but it depends on careful placement. This makes pulli kolam a lovely example of how discipline and creativity support each other.
Historically, such patterns have travelled through household practice, notebooks, community sharing, and now online tutorials. They also connect naturally with mathematics because they involve symmetry, repetition, curves, networks, and spatial thinking.
A simple beginner pattern
Try a 3 by 3 dot grid. Place nine dots evenly like a square. Now draw small curved petals around the centre dot, using the surrounding dots as guides. Add curves around the outer dots to make a small flower or diamond. Keep the design small and focus on neat spacing.
Next, try a 5-dot straight row. Draw a line connecting the dots, then add small loops between them. This teaches control. After that, try a tapering grid: 3 dots, then 2, then 1. Create a small triangular pattern around it.
Practice tips
Place dots carefully before drawing. If the dots are uneven, the lines become difficult. Use light dots when practising in a notebook, and use a washable material on the floor. Before drawing with powder, trace the path once with your finger.
Do not worry if your curves are shaky. Pulli kolam improves through repetition. The same pattern drawn ten times will teach you more than ten complicated designs tried only once.
Why pulli kolam is beautiful
Pulli kolam is beautiful because it reveals how a simple dot can become part of a larger harmony. Alone, a dot is tiny. In a grid, it becomes structure. With a line, it becomes movement. With repetition, it becomes art.
That is a gentle lesson for life too. Small points of attention, placed carefully, can become something graceful. Pulli kolam teaches this not through a lecture, but through the hand, the floor, and a pattern that appears one line at a time.
How dots teach symmetry
The beauty of pulli kolam is that the dots quietly teach symmetry. If one side has three dots and the other side has three dots, your line must respect that balance. When you draw around the grid, you begin to see left and right, top and bottom, centre and edge. This is why pulli kolam is a natural art lesson and a natural geometry lesson.
Students can learn reflection, rotation, counting, spacing, and pattern recognition through these designs. But the learning does not feel like a dry exercise because the final result is beautiful. The mathematics is hidden inside the art.
What makes a good pulli kolam
A good beginner pulli kolam has clear dots, even spacing, smooth curves, and a completed path. It does not need to be large. In fact, small designs often show skill more clearly because every uneven line is visible.
As you practise, compare your finished design with the dot grid. Did the line give equal space to each dot? Did the pattern feel balanced? Did the ending meet the beginning neatly? These questions help you improve without discouraging you.